개요
WizFi310은 KT IoTMakers 플랫폼을 사용하기 위한 AT Command를 지원하며, AT Command를 사용하면 MCU에서 별도의 라이브러리 포팅 없이 KT 플랫폼을 사용 할 수 있다. 본 포스팅에서는 WizFi310 Wi-Fi Module을 이용해서 KT IoTMakers 플랫폼을 사용하는 방법에 대해 설명한다.
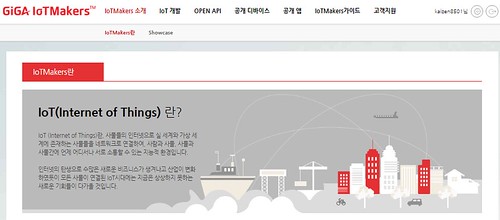
olleh GiGa IoTMakers란?
IoTMakers는 IoT Player들이 쉽게 IoT생태계에 참여할 수 있도록 지원하는 KT의 개방형 IoT 플랫폼이다. 해당 플랫폼을 통해 손쉽게 IoT 디바이스를 연결하여 테스트 할 수 있고, 수집된 데이터를 관리 하고, 제공되는 OPEN API를 통하여 IoT 서비스를 만들 수 있다.
iotmakers.olleh.com 참고
IoTMakers Device 등록
http://iotmakers.olleh.com/에 회원 가입 후, [IoT 개발]-[나의 디바이스]-[디바이스 등록] 메뉴를 선택 한다.
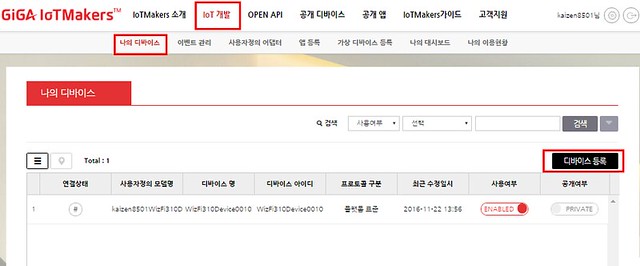
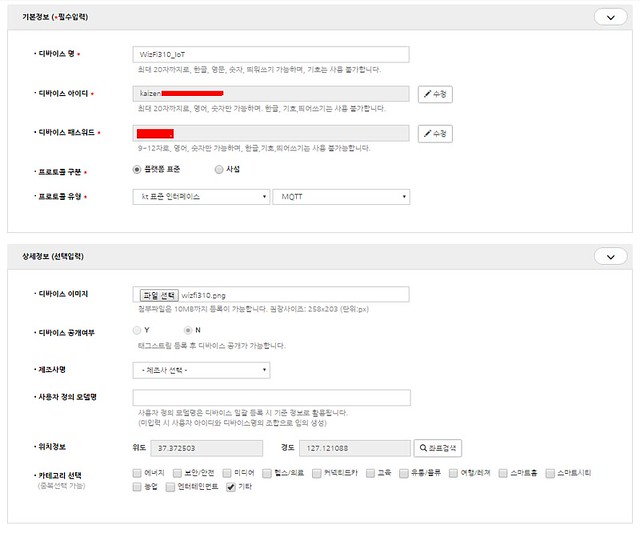
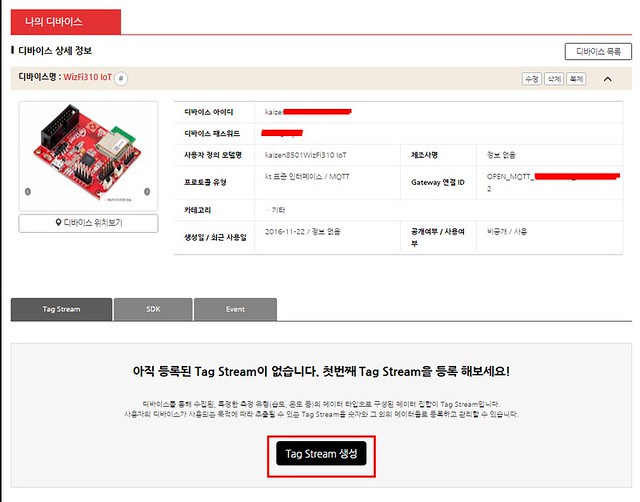
디바이스 등록을 위해 필요한 정보를 위와 같이 기입 하면 아래 그림과 같이 나의 디바이스에 새로 생성된 디바이스를 확인 할 수 있다. 해당 디바이스를 클릭 하면 아래와 같이 디바이스의 상세 설명 값을 확인 할 수 있고, Device로 부터 수집한 데이터나 디바이스를 제어 하기 위한 Tag Stream을 생성 할 수 있다.
( 참고로 디바이스 상세 정보에 있는 디바이스 아이디, 디바이스 패스워드, Gateway 연결 ID는 디바이스가 IoTMakers 플랫폼에 접속하기 위해 필요한 정보로, 미리 적어 두는 것이 좋다. )
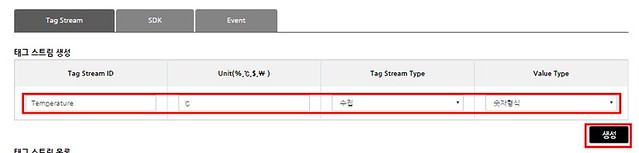
본 예제에서는 숫자 형식의 Temperature, 문자열 형식의 LED1의 데이터를 수집하고 문자열 형태로 제어 신호를 보내는 Power Tag Stream ID를 만들었다.


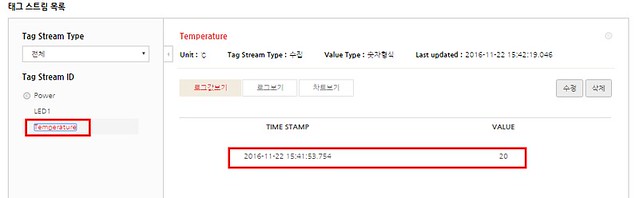
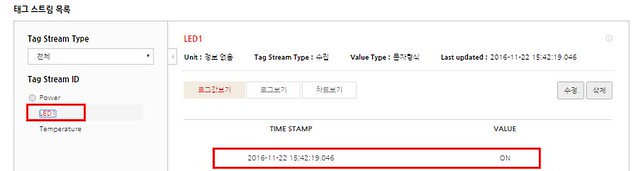
생성된 태그 스트림들은 아래 그림과 같이 태그 스트림 목록에서 확인 할 수 있다.
KT IoT Makers 사용을 위한 WizFi310 AT Command 정의
- Store the configuration : AT+IMCFG=ip,port,devId,devPw,gwId
- devID : 디바이스 아이디, devPw : 디바이스 패스워드, gwId : Gateway 연결 ID
- Connect to IoTMakers : AT+IMCONN
- Disconnect : AT+IMDISCONN
- Send Simple Data : AT+IMSEND=type,tagid,tagval
- Send Multiple Data : AT+IMSENDM=data,data,… :data=type,tagid,tagval
KT IoT Makers를 위한 WizFi310 AT Command 예제
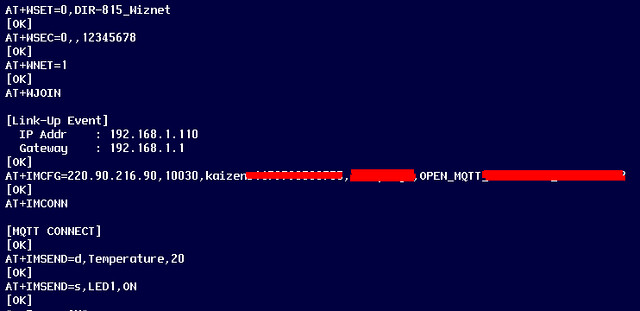
위 명령은 다음과 같은 동작을 수행한다.
- DIR-815_Wiznet 이란 SSID를 가지는 AP에 접속 ( 비밀번호 : 12345678 )
- KT IoTMakers 플랫폼에 접속
- Temperature 값 송신 ( 값 :20 )
- LED1 값 송신 ( 값 : ON )
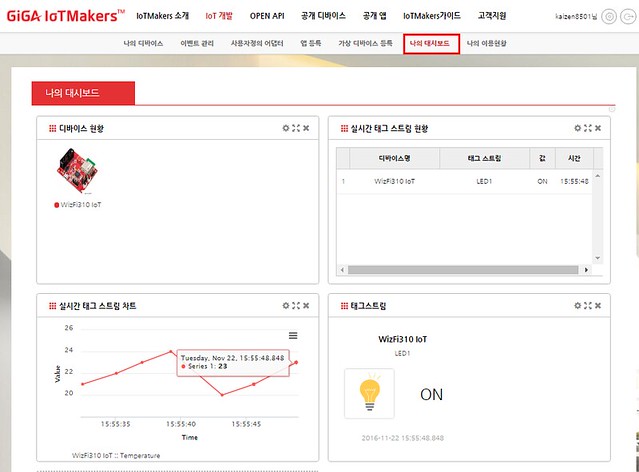
IoTMakers 페이지의 태스 스트림 목록을 확인하면 아래와 같이 값이 수신된 것을 확인 할 수 있으며, [IoT 개발]-[나의대시보드]를 확인 하면 아래 그림과 같이 대시보드를 꾸밀 수 있다.
AT+IMSENDM=d,Temperature,20,s,LED1,ON
위 명령을 수행하면 한번에 Temperature 값과 LED1 값을 송신 할 수 있다.
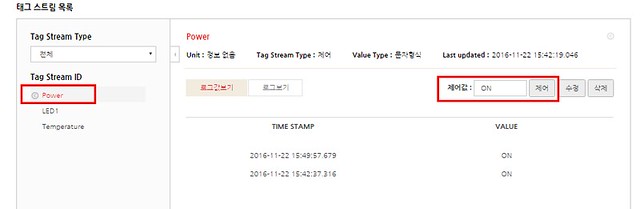
IoTMaker 플랫폼은 원격에 있는 디바이스를 제어하기 위한 기능도 제공하고 있으며, 아래 그림과 같이 미리 만들어 놓은 Power 스트림에 On이라는 제어 값을 입력하고 제어 버튼을 클릭하면 된다.
IoTMakers로 부터 제어 값을 받은 WizFi310은 아래와 같이 출력한다. MCU 입장에서는 WizFi310의 Serial 만 모니터링 하면 플랫폼으로 부터 제어 신호를 받을 수 있다.
( 수신되는 데이터 포맷 : “type,tagId,TagVal” )
